Composting is one of the most rewarding and eco-friendly projects you can do at home. With just a few easily available materials and a bit of know-how, you can turn kitchen scraps and yard waste into nutrient-rich compost that fuels your garden. Whether you live in a house with a yard, apartment with a balcony, or even a small indoor space, this guide will walk you through creating and maintaining a compost bin that suits your space and needs.
Why Build Your Own Compost Bin?
Commercial compost bins are convenient but can be expensive. Making your own offers several benefits:
- Cost savings: Repurpose old containers or scrap materials for an eco-friendly twist.
- Custom sizing: Create a bin to fit your space—whether large or tiny.
- Learning experience: Understand the composting process intimately.
- Satisfaction: There’s real joy in converting waste into soil magic.
Let’s dive into how to build the perfect bin for your home.
Step 1: Choose the Right Location
The location of your bin matters for airflow, moisture, and convenience.
Outdoors:
- Place on soil or grass for drainage and easy worm activity.
- Choose a partially shaded area to avoid overheating or drying out.
- Keep it within comfortable reach to encourage regular feeding.
Balconies or Patios:
- Use a container with good ventilation.
- Line with gravel or mesh to prevent pests and moisture issues.
- Keep it on a tray or saucer if flooring needs protection.
- If composting outdoors isn’t allowed, plan to transfer scraps to community bins or indoor systems.
Indoors:
- A small bokashi, vermicomposter, or countertop bin works well.
- Place near the kitchen—within easy reach.
- Ensure there’s ventilation or filters to avoid odor buildup.
Step 2: Decide Which Composting Method to Use
There are several methods you can choose based on your space, waste, and composting goals.
Backyard Compost Bin
- Simple bin made from pallets, wire mesh, or wood boards.
- Ideal for large volumes—yard waste, kitchen scraps, etc.
Compost Tumbler
- Plastic or metal drum you can rotate.
- Enclosed, pest-resistant, fast composting.
Worm Bin (Vermicompost)
- Indoor-friendly, uses red worms to break down scraps.
- Compact, low-odor, and produces both compost and liquid fertilizer (“worm tea”).
Bokashi System
- Fermented compost technique using anaerobic bins and bran inoculated with beneficial microbes.
- Works well indoors, but final composting requires soil or outdoor mixing.
Step 3: Gathering Materials
Here are the materials commonly needed for DIY compost bins:
| Bin Type | Materials |
|---|---|
| Pallet bin | 3–4 wooden pallets, hinges or wire, mat to line |
| Wire bin | Heavy-gauge wire mesh and cable ties |
| Tumbler | 55-gallon barrel with drilled holes and stand |
| Worm bin | Opaque plastic tub, drilled holes, bedding (paper, coco coir), red wigglers |
| Bokashi bin | Airtight container with spigot, bokashi bran, kitchen scraps |
Tools You Might Need:
- Drill or screwdriver
- Saw or utility knife
- Wire cutters
- Gloves and safety goggles
Step 4: The Building Process
A. Pallet or Wooden Bin:
- Stand pallets upright in a U-shape.
- Connect with twine, nails, or screws.
- Add a removable front for easy turning and access.
- Add a base or leave the bottom open for soil contact.
B. Wire Mesh Bin:
- Shape mesh into a circle or square.
- Secure with wire ties or clips.
- Leave top open for additions and turning.
C. Compost Tumbler:
- Drill 12–16 holes around barrel for airflow and drainage.
- Attach to stand using bolts or pipes.
- Install sealed lid and optional thermometer opening.
- Secure bin to allow easy rotation.
D. Worm Bin:
- Drill holes in lid and bottom for ventilation and drainage.
- Layer damp paper and coco coir inside.
- Add kitchen scraps gradually and introduce worms.
- Cover with breathable cloth to reduce light and odors.
E. Bokashi Bin:
- Ensure bin is airtight with tapping lid.
- Drill small holes or skewer to connect juice line to spigot.
- Layer scraps and sprinkle bokashi bran.
- Compact, seal, and ferment for 2–3 weeks.
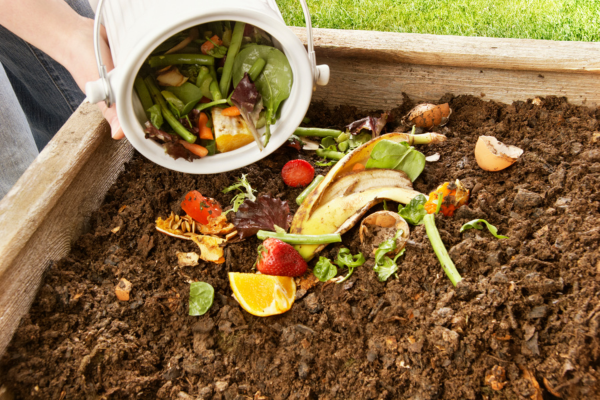
Step 5: What Can Be Composted?
Green (Nitrogen-Rich):
- Fruit and veg scraps
- Coffee grounds and tea bags
- Fresh grass clippings
- Green plant trimmings
Brown (Carbon-Rich):
- Dry leaves
- Cardboard, paper
- Straw or hay
- Sawdust (from untreated wood)
Do NOT Compost:
- Meat, dairy, and oils (pest-attracting)
- Diseased plants or invasively rooted plants
- Pet or human waste (unless treated properly)
- Glossy paper or coated materials
Step 6: Balancing Greens and Browns
Compost breaks down best when the mix is 2–3 parts brown to 1 part green.
- Too many greens → wet, smelly compost.
- Too many browns → slow decomposition.
Adjust by adding dry leaves or shredded paper when the compost smells or steaming.
Step 7: Turning and Aeration
Why It Matters:
Turning introduces oxygen, crucial for healthy decomposition and preventing odors.
How Often:
- Backyard bins: Every 1–2 weeks.
- Tumblers: After every few days of use.
- Worm bins: No turning—worms aerobically process the matter.
- Bokashi: No turning—allow fermentation.
Step 8: Maintaining Moisture
Correct moisture levels are vital.
- Compost should feel like a damp kitchen sponge.
- Too dry? Mist water over the pile.
- Too wet? Add dry browns and increase airflow.
Step 9: Dealing with Problems
Odor:
- Caused by too many greens and lack of air.
- Add browns, turn the pile, and ensure airflow.
Pests:
- Fly traps; fully bury food in outdoor bins.
- Secure lid and base to prevent rodent access.
Mold:
- A natural part of decomposition.
- Increase airflow by turning the pile.
Slow Decomposition:
- Chop ingredients smaller.
- Use a heated tumbler or add compost activators.
Step 10: Harvesting Compost
Backyard bin compost takes 2–6 months.
✓ It’s ready when:
- Dark, crumbly, and earthy smelling.
- Original scraps are unrecognizable.
Harvest by:
- Using a screen to remove big pieces before applying.
- Replacing with fresh browns and greens.
Step 11: Using Compost
- Top dressing: Spread on flower and vegetable beds.
- Potting mix: Add ¼ compost to soil mix.
- Mulch: Apply 1–2″ under plants to conserve moisture.
- Seed starter: Mix with perlite and soil for seedlings.
Step 12: Composting in Small Spaces
Indoor Tips:
- Use worm or bokashi bins under sinks or in closets.
- Freeze scraps and transfer when bin is convenient.
- Take scraps to neighborhood community compost hubs.
In Apartment Buildings:
- Encourage residents to participate in composting clubs.
- Provide secure communal bins.
Step 13: Teaching and Sharing
Make composting a family or community activity.
- Use class “compost jars” to explain waste breakdown.
- Involve kids in feeding and harvesting compost.
- Host a compost station at block parties or eco-events.
- Label your bin “compost in progress” to inspire neighbors.
Tips for Maximum Compost Success
- Shred or chop materials to speed decomposition.
- Layer greens and browns, ending with a brown layer to reduce pests.
- Use compost activators (like compost tea or aged manure).
- Work smarter: Use kitchen scraps bags to store until bin is ready.
- Keep a compost thermometer to track internal heat (~130–160°F ideal, backyard bins only).
- Use mesh or chicken wire as a skirt to block rodents under the bin.
Final Thoughts
Creating your own compost bin is a simple yet powerful way to reduce waste, feed your garden, and support a sustainable lifestyle. With basic materials, a bit of effort, and proper care, you’ll transform organic trimmings into “black gold”—a nutrient-rich resource for healthy plants. No matter your space, there is a composting solution for you.
Get started today: build your bin, collect your scraps, and watch the magic of composting unfold. Your garden — and the planet — will thank you.