Gardening in small spaces doesn’t have to be limiting. In fact, it can be incredibly creative and rewarding—especially when you take your garden upward. Vertical gardening is the perfect solution for people with limited ground space, whether you’re living in an apartment, have a small balcony, or simply want to add a lush green wall to your home.
A vertical garden allows you to grow flowers, herbs, vegetables, and even ornamental plants using walls, fences, or custom-built structures. Not only is it space-saving, but it also transforms bland walls into vibrant, living art.
In this step-by-step guide, you’ll learn everything you need to know to build your own vertical garden, from choosing the right location and structure to selecting plants and maintaining your green wall with ease.
What Is a Vertical Garden?
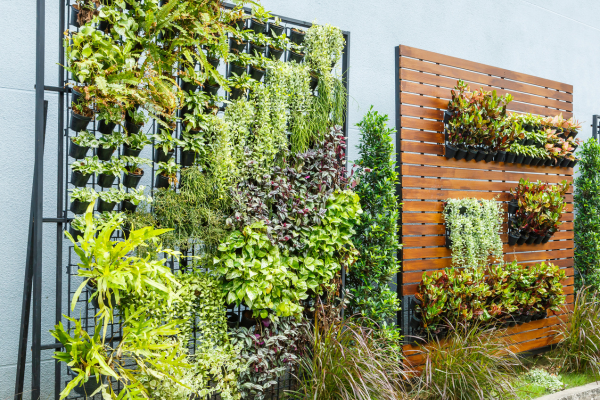
A vertical garden—also known as a green wall or living wall—is a method of growing plants on a vertical surface rather than in traditional horizontal beds. This can be as simple as a pallet leaned against a wall or as elaborate as a custom-built, hydroponic garden system.
Vertical gardens are ideal for:
- Small balconies, patios, or backyards
- Apartment living
- Enhancing outdoor walls or fences
- Beautifying indoor rooms with plants
They’re both functional and decorative, allowing you to grow food, purify the air, and create a visually appealing green space.
Benefits of Vertical Gardening
Before we jump into the how-to, here are some reasons why vertical gardening is worth your time and energy:
1. Maximizes Small Spaces
Grow more in less space by using walls, trellises, or hanging structures.
2. Improves Air Quality
Plants in vertical gardens filter dust, pollutants, and carbon dioxide.
3. Reduces Heat and Noise
Green walls can cool down surfaces and reduce echo in urban areas.
4. Provides Easy Access
Perfect for people with mobility issues—no bending or kneeling required.
5. Adds Beauty and Value
Living walls are aesthetically pleasing and can increase property appeal.
Now let’s break down how to build your own.
Step 1: Choose the Best Location
Your vertical garden’s success largely depends on its location. Consider the following factors:
Sunlight
- Full sun (6+ hours): Great for herbs, vegetables, succulents
- Partial shade (3–6 hours): Ideal for ferns, lettuce, begonias
- Low light (indoors): Choose low-light indoor plants like pothos or peace lilies
Accessibility
- Make sure you can easily water, trim, and harvest the plants
- Avoid high-traffic areas where plants could be damaged
Surface
- Sturdy walls, fences, or balcony railings work best
- For indoor vertical gardens, use moisture-resistant backing (like PVC or treated wood)
Step 2: Select the Type of Vertical Garden Structure
There are many types of vertical garden systems—choose one based on your space, budget, and skill level.
DIY Options:
- Pallet Garden
- Affordable and easy to make
- Great for small plants and herbs
- Hanging Pots
- Use metal or wooden frames with hanging planters
- Stylish and flexible layout
- Pocket Planters
- Fabric or felt systems with multiple planting pockets
- Lightweight and ideal for indoor use
- Ladder Shelves
- Leaning wooden shelves for pots
- Great for a rustic aesthetic
- Trellis with Vines
- Wooden or metal trellises for climbing plants
- Adds vertical drama
Store-Bought Systems:
- Modular panel systems with built-in irrigation
- Hydroponic vertical towers
- Pre-assembled wall gardens
For beginners, starting with a pallet or hanging pots is often the easiest and most budget-friendly route.
Step 3: Prepare Your Materials
Here’s what you’ll typically need:
Materials:
- Chosen vertical structure (pallet, trellis, hanging frame)
- Quality potting mix or soil appropriate for your plants
- Geotextile fabric or plastic liner (to hold soil)
- Screws, nails, zip ties (depending on setup)
- Drill and basic tools
Optional:
- Irrigation system (drip or hose with timer)
- Mulch or pebbles for top layer
- Fertilizer (organic preferred)
If you’re repurposing a pallet, sand it thoroughly to avoid splinters and line it with fabric to hold soil.
Step 4: Choose the Right Plants
Plant selection is key to a healthy vertical garden. You’ll want plants that:
- Are suited to the amount of light your garden receives
- Have shallow root systems
- Grow well in containers or small spaces
Great Vertical Garden Plants:
Herbs:
- Basil
- Thyme
- Oregano
- Mint (plant in a separate container to prevent spreading)
- Parsley
Vegetables:
- Lettuce
- Spinach
- Cherry tomatoes (need support)
- Peas and beans (climbers)
Flowers:
- Petunias
- Marigolds
- Nasturtiums
- Begonias
Indoor Plants:
- Pothos
- Ferns
- Philodendrons
- Snake plant
Mix in different leaf textures and colors for visual interest.
Step 5: Plant and Arrange with Purpose
When placing your plants, consider watering needs and growth habits. Here’s how to make the most of your layout:
Grouping:
- Group plants with similar light and water requirements
- Place larger or cascading plants near the bottom
- Use upright or fast-growers toward the top
Spacing:
- Don’t overcrowd plants—airflow is essential
- Leave space for growth
Soil:
- Use lightweight, nutrient-rich potting mix
- Add perlite or sand for better drainage
Tip: Add slow-release fertilizer pellets when planting for long-term nutrition.
Step 6: Install and Secure the Garden
Secure your vertical garden to a wall, fence, or railing using brackets, screws, or heavy-duty hooks. Make sure it’s stable and level.
If your structure is heavy (like a fully planted pallet), install wall anchors or support beams to distribute the weight safely.
Check weight-bearing capacity before installing on balconies or indoors.
Step 7: Watering and Maintenance
Vertical gardens dry out faster than traditional gardens. Watering can be manual or automated.
Watering Options:
- Hand watering with a long-spout watering can
- Drip irrigation system for even moisture
- Self-watering containers with reservoirs
Maintenance Tips:
- Check moisture daily in warm weather
- Prune dead leaves and spent flowers regularly
- Replenish nutrients every 4–6 weeks
- Rotate plants occasionally for even growth
Watch out for signs of stress like drooping, yellowing, or spots—these usually signal water or light imbalances.
Troubleshooting Common Issues
Problem: Bottom plants drying out
Solution: Water thoroughly from the top or install drip irrigation
Problem: Mold or mildew on leaves
Solution: Improve airflow, avoid overwatering, and remove affected leaves
Problem: Poor growth or pale leaves
Solution: Check for nutrient deficiencies and adjust sunlight exposure
Vertical Garden Design Ideas
Get creative with these themed vertical garden concepts:
1. Herb Kitchen Wall
Mount fabric pockets or small pots on a kitchen wall and fill with culinary herbs.
2. Succulent Art Frame
Build a wooden shadow box and plant succulents in a geometric design.
3. Flower Tower
Stack pots vertically on a rod to create a cascading floral display.
4. Indoor Green Wall
Use pocket planters with pothos, ferns, and philodendrons for a lush, tropical vibe indoors.
5. Children’s Garden
Use colorful containers at child-friendly heights and grow fast-growing plants like lettuce, mint, and strawberries.
Final Thoughts: Growing Up, Not Out
Vertical gardening is more than a trend—it’s a smart, stylish, and sustainable way to garden in today’s compact living environments. Whether you dream of a lush green wall, a kitchen herb station, or a flower-filled balcony, a vertical garden can help you maximize space and beauty in any setting.
With the right materials, a little planning, and ongoing care, you’ll have a thriving vertical garden that turns heads and feeds your soul.
So grab your tools, pick your plants, and start building upward—your garden will thank you.